

I know that this is out dated but let me take you to the System Menu that I consumed before my Wii bricked after a power cut off! Let me do this, anyway it's my first post. ☺
Now for the scaring part...
DO THIS AT YOUR OWN RISK! IF YOU DON'T KNOW THE RISK THEN DO SOME RESEARCH AND GET INFORMED!
THIS GUIDE WILL WORK ON ANY REGION/SERIAL SYSTEM WITH 4.1 AND BELOW FIRMWARE - EXCEPT KOREAN!
THOSE THAT HAVE A LU64, LEH250 OR LAH113 AND ABOVE SHOULD NOT NOT DOWNGRADE ANY IOS OR FIRMWARE AFTER PERFROMING THIS GUIDE.
Now let's start!!!
THINGS YOU NEED:
WII SYSTEM: With 4.1 firmware or below (DO NOT UPGRADE).
SD/SDHC CARD: An EMPTY 1GB/2GB formated FAT32 SD Card (up to 32GB SDHC if you have 4.0/4.1 firmware). Do not use a Micro-SD card with Adapter (even if others claim they have used them).
WIFI:
DISCONNECT: any Game Cube controller, Game Cube Memory Card and USB Device from Wii.
==============================================================
SD CARD PREPARATION:
Download this SOFTMODPACK HERE.
Mirror Link HERE.
Extract the SOFTMOD PACK to your PC.
Now Extract the "EXTRACT TO SD CARD" file to your SD Card.
Due to copyright issues I am not including official Nintendo IOS files in the softmod pack. The steps below will show you how to download them using your PC.
Start NUS Downloader v1.2 (it is included in the SOFTMOD PACK). Make sure Microsoft .NET Framework has been installed on your PC.
Click on Generate Certs (if you haven't used this application before).
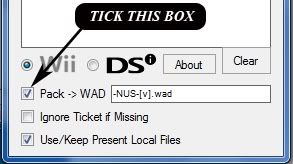
Tick the Box for -- Pack-> WAD
WII SYSTEM: With 4.1 firmware or below (DO NOT UPGRADE).
SD/SDHC CARD: An EMPTY 1GB/2GB formated FAT32 SD Card (up to 32GB SDHC if you have 4.0/4.1 firmware). Do not use a Micro-SD card with Adapter (even if others claim they have used them).
WIFI:
DISCONNECT: any Game Cube controller, Game Cube Memory Card and USB Device from Wii.
==============================================================
SD CARD PREPARATION:
Download this SOFTMODPACK HERE.
Mirror Link HERE.
Extract the SOFTMOD PACK to your PC.
Now Extract the "EXTRACT TO SD CARD" file to your SD Card.
Due to copyright issues I am not including official Nintendo IOS files in the softmod pack. The steps below will show you how to download them using your PC.
Start NUS Downloader v1.2 (it is included in the SOFTMOD PACK). Make sure Microsoft .NET Framework has been installed on your PC.
Click on Generate Certs (if you haven't used this application before).
Tick the Box for -- Pack-> WAD
Now go to Database>IOS>IOS15>v257
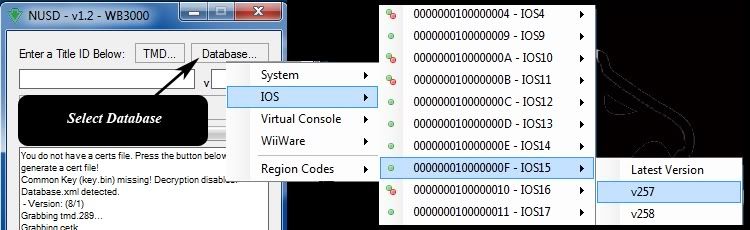
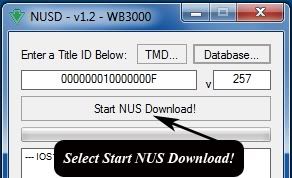
Then select Start NUS Download.
Follow the above steps for the following IOS files...
Now go to Database>IOS>IOS15>v266
Then select Start NUS Download.
Now go to Database>IOS>IOS36>v3094
Then select Start NUS Download.
Now go to Database>IOS>IOS38>v3610
Then select Start NUS Download.
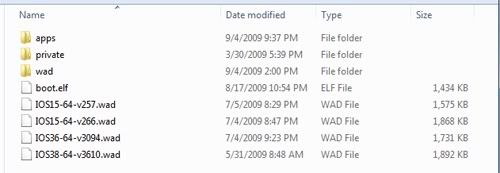
After you have finished downloading the above files you will see NUS has created 4 folders. Each folder will contain a WAD file you need to transfer to the root of the SD Card.
Transfer the following WAD files to the root of the SD Card...
IOS15-64-v257.wad
IOS15-64-v266.wad
IOS36-64-v3094.wad
IOS38-64-v3610.wad
WARNING: If you have to rename the WAD files to match the above then you are doing something wrong. You should not have to rename the WAD files.
Your SD Card should now look like the below image...
Now go to Database>IOS>IOS15>v266
Then select Start NUS Download.
Now go to Database>IOS>IOS36>v3094
Then select Start NUS Download.
Now go to Database>IOS>IOS38>v3610
Then select Start NUS Download.
After you have finished downloading the above files you will see NUS has created 4 folders. Each folder will contain a WAD file you need to transfer to the root of the SD Card.
Transfer the following WAD files to the root of the SD Card...
IOS15-64-v257.wad
IOS15-64-v266.wad
IOS36-64-v3094.wad
IOS38-64-v3610.wad
WARNING: If you have to rename the WAD files to match the above then you are doing something wrong. You should not have to rename the WAD files.
Your SD Card should now look like the below image...
==============================================================
HBC 1.0.3 & BOOTMII INSTALL:
This section will install Homebrew Channel 1.0.3 to your Wii System.
DO NOT HAVE THE SD CARD INSERTED INTO THE WII SYSTEM AT THIS TIME!
Go to WII SETTINGS>DATA MANAGEMENT>CHANNELS>SD CARD TAB (make sure you go to CHANNEL not GAME DATA).
You will get a message saying "Nothing is inserted in the SD Card slot".
At this time insert the SD card into the Wii System.
You will get a message saying "Load Boot dol/elf?" Select YES.
This will start the Hackmii installer.
Press 1 to continue at the warning screen.
Select Continue again at the page that shows what can and can not be installed.
At the main menu go up to Install Homebrew Channel and Press A.
Follow the prompts to install HBC.
After it says success select continue again.
Now go down to Bootmii and Press A.
Try to install Bootmii as Boot2 first. If it will not let you install it as Boot2 then install it as an IOS.
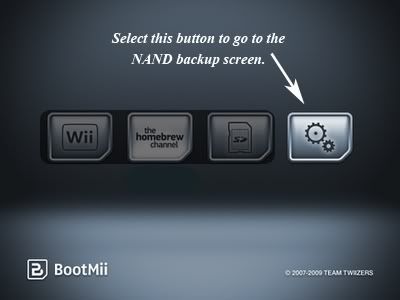
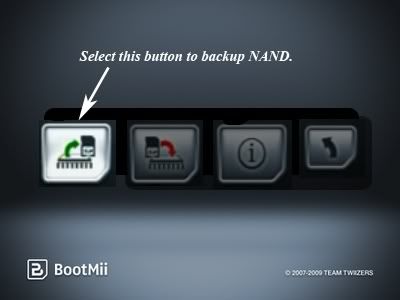
After Bootmii installs make a backup of your NAND.
Follow the images below to backup your NAND (I recomend having 600MB or more free space on the SD card).
This section will install Homebrew Channel 1.0.3 to your Wii System.
DO NOT HAVE THE SD CARD INSERTED INTO THE WII SYSTEM AT THIS TIME!
Go to WII SETTINGS>DATA MANAGEMENT>CHANNELS>SD CARD TAB (make sure you go to CHANNEL not GAME DATA).
You will get a message saying "Nothing is inserted in the SD Card slot".
At this time insert the SD card into the Wii System.
You will get a message saying "Load Boot dol/elf?" Select YES.
This will start the Hackmii installer.
Press 1 to continue at the warning screen.
Select Continue again at the page that shows what can and can not be installed.
At the main menu go up to Install Homebrew Channel and Press A.
Follow the prompts to install HBC.
After it says success select continue again.
Now go down to Bootmii and Press A.
Try to install Bootmii as Boot2 first. If it will not let you install it as Boot2 then install it as an IOS.
After Bootmii installs make a backup of your NAND.
Follow the images below to backup your NAND (I recomend having 600MB or more free space on the SD card).
Bootmii as Boot2 will boot menu when Wii is turned on. Navigate using a Gamecube Controller or Power Reset.
Bootmii as IOS will boot from Homebrew Channel Home screen. Navigate using Game Cube Controller (if you do not have a Game Cube Controller then you will not be able to navigate the Bootmii menu to backup your NAND). If this is the case then skip backing up your NAND.
FOR MORE INFO ON HOMEBREW CHANNEL GO HERE.
FOR MORE INFO ON BOOTMII GO HERE.
Those that have previoulsy installed Bootmii or HBC and want to update to the latest versions only need to install over the older versions.
This is a warning for those that decide to install/update to the latest DVDx version. Due to the Title ID of DVDx being changed previous applications that use DVDx will need to be recompiled to look for the new Title ID of DVDx. Please do not ask questions about DVDx or apps that use it in this thread. This is just a courtesy warning to those that use it. If you have an issue with DVDx or an application that uses DVDx please start a new thread.
Those that have an Upside down Homebrew Channel can uninstall the HBC then reinstall it. If that doesn't fix it then run DOP-IOS and install IOS61 without sig/hash patch.
==============================================================
IT IS SAFE TO DOWNGRADE IOS15 ON ALL SYSTEMS! THOSE THAT HAVE A LU64, LEH250 OR LAH113 AND ABOVE SHOULD NOT DOWNGRADE ANY OTHER IOS OTHER THEN IOS15!
DOWNGRADE IOS15:
Start Trucha Bug Restorer (Launch with Homebrew Channel).
Press B to continue without IOS reload (ios at the top can be left as default)
After a few seconds you will get a message that says Press 1 to start the application. At that time press 1
Go to Downgrade IOS15 and press A.
When you see...
Press A.
When you see...
Press A.
After prepration...
Press A for Step 1
Press A for Step 2
Press Any button to exit the application.
MORE INFO ON TRUCHA BUG RESTORER HERE.
==============================================================
PATCH IOS36:
Start Trucha Bug Restorer again.
Select which IOS to Load (Change to IOS15) and Press A.
Again after a few seconds you will get a message that says Press 1 to start the application. At that time press 1
Go to IOS36 menu and Press A.
Make sure you select the below settings...
Install IOS to Slot: 36
patch hash check (trucha): YES
patch ES_Identify: YES
patch nand permissions: YES
then go up to Install patched IOS36 and press A.
When you see...
Press A.
After preparation press A to install.
After the install is finished Press any button to exit.
==============================================================
RESTORE IOS15:
Start Trucha Bug Restorer again.
Select which IOS to Load (Change to IOS36) and Press A.
Again after a few seconds you will get a message that says Press 1 to start the application. At that time press 1
Go to Restore IOS15 and Press A
When you see...
Press A.
After preparation press A to install.
After the install is finished Press any button to exit.
==============================================================
cIOS38_rev14:
Start the Homebrew Channel and run "cIOS38_rev14 Installer".
Select IOS36 for the IOS to use for Instillation.
Select WAD Installation.
After the cIOS is installed the Wii should reboot to the Wii Channel menu.
WARNING: If you get a ret- error please redownload the WAD files using NUS and redo steps Downgrade IOS15/Patch IOS36/Restore IOS15 (Also make sure your using a SD Card NOT Micro-SD with Adapter).
==============================================================
NeoGamma R7:
Run WAD Manager.
Select A to agree to the disclaimer.
Select IOS version to use:
Select NAND Emulation device
Select source device:
Go to NeoGamma_R7.wad and press A.
Select action:
FOR BEST BACKUP COMPATIBILITY USE QUALITY DVD-R MEDIA (NOT DVD+R OR RW). I ALSO DON'T WANT THOSE THAT USE DVD+R MEDIA TO POST IN THE THREAD AND SAY THAT YOU USE DVD+R MEDIA. I COULD CARE LESS WHAT MEDIA YOU USE! FOR BEST BACKUP COMPATIBILITY RESULTS USE DVD-R MEDIA!
==============================================================
IOS60Patched:
IOS60Patched only needs to be installed if you have 4.0 or 4.1 firmware.
Run WAD Manager.
Select A to agree to the disclaimer.
Select IOS version to use:
Select NAND Emulation device
Select source device:
Go to IOS60Patched.wad and press A.
Select action:
After the WAD files are installed press HOME to return to the Wii System menu.
Now you can load Wii backup games from NeoGamma R7.
==============================================================
EXTRA STEPS: YOU DO NOT HAVE TO FOLLOW THESE STEPS BUT I HAVE ADDED THEM IN CASE YOU WANT TO.
4.0 SYSTEM MENU:
Those that have 3.4 and below firmware can follow this section to update to System Menu 4.0 (if you have 3.4 firmware or below and want to update to 4.1 firmware perform this step first before updating to 4.1 System Menu).
[ REQUISITES ]
150-250 free blocks.
Internet connection.
Start Homebrew Channel and run Firmware Updater 4.0 and follow the on-screen instructions.
4.1 SYSTEM MENU:
Those that have 4.0 firmware can follow this section to update to System Menu 4.1 (if you have 3.4 or below firmware then run the 4.0 Updater first before running this 4.1 Updater).
[ REQUISITES ]
150-250 free blocks.
Internet connection.
Start Homebrew Channel and run Firmware Updater 4.1 and follow the on-screen instructions.
4.2 Shop Channel v18:
Those that want to update to 4.2 v18 Shop Channel can follow the below instructions.
Start the Homebrew Channel and run 4.2 Shop Channel and follow the on-screen instructions.
At spots it can seem like it has frozen. Do not restart or turn off Wii just let it do its work.
Game Cube Support:
WARNING: I DON'T KNOW IF cMIOS IS COMPATIBLE WITH LU64, LEH250 OR LAH113 AND ABOVE SYSTEMS. IF ANYONE KNOWS FOR SURE LET ME KNOW AND I WILL REMOVE THIS WARNING.
1) Launch the Homebrew Channel via the Wii channel menu. Select the cMIOS Installer in the Homebrew Channel list. This will start the installer. You need to press A to accept that you have read the disclaimer.
You have 2 options on how to install the cMIOS files (you do not need to do both options!)...
WAD Installation: Google RVL-mios-v8.wad and download it. Then place it in the root of the SD Card. Then chose WAD Instillation option.
Network Installation: At the instillation option screen press right 1 time on the D-pad of the Wiimote. This will download the files via WiFi.
After you have selected the option you want and installed the cMIOS your Wii should reboot to the Wii Channel menu.
Now you can launch the backup Game Cube games from the NeoGamma R6 backup launcher channel in the Wii channel menu.
DOP-IOS:
I would suggest using DOP-IOS to install and patch newest version of the below IOS.
ALL SYSTEMS/SERIAL # CAN USE DOP-IOS. THOSE WITH LU64, LEH250 OR LAH113 AND ABOVE CAN USE THIS APPLICATION. DO NOT DOWNGRADE ANY IOS OR FIRMWARE. INSTALL & PATCH THE LATEST IOS REVISION AVAILABLE INSTEAD OF DOWNGRADING TO A LOWER REVISION. DOWNGRADING TO A LOWER REVISION MAY BRICK YOUR SYSTEM!
IOS9 - Used by launch titles (Zelda).
IOS12 - (no description).
IOS13 - (no description).
IOS15 - (no description).
IOS17 - (no description).
IOS21 - Used by old 3rd party titles.
IOS31 - (no description).
IOS33 - (no description).
IOS34 - (no description).
IOS35 - Used by Super Mario Galaxy.
IOS37 - Used mostly by music games.
IOS38 - Used by some modern titles.
IOS53 - Used by some modern titles and channels.
IOS55 - Used by some modern titles and channels.
IOS56 - Used by Wii Speak.
Start DOP-IOS (via Homebrew Channel).
Go to IOS9 (use D-Pad left & right).
Press A to install latest version.
Press A at Are you sure you want to install IOS9 vXXXX.
Press A at Apply Sig Hash Check patch to IOS9.
Let it do its work (Be patient it may seem that the Wii system has froze but do not turn off or reset the system).
After it has finished press any button to continue.
You should now go back to the DOP-IOS main screen. Now use the d-pad (left & right) to go to the next IOS I have listed above. Follow the above directions to install and patch the newest version of that IOS.
After you have done the last IOS in the above list (IOS56) and you go to the Main Screen press HOME button to exit DOP-IOS.
FOR MORE INFO ON DOP-IOS GO HERE.
Hermes' IOS 222/223:
Those that want to play Guitar Hero or Rock Band will need to perform this guide HERE so the instruments can be synced to the system. I do not use this myself so if you have any questions or issues start a new thread and ask. I just wanted to give a link for those that want to install it.
==============================================================
YOU CAN NOW FORMAT THE SD CARD TO CLEAR ALL SOFTMOD PACK APPLICATIONS AND FILES FROM IT.
==============================================================
USB LOADER SECTION:
SDUSB LOADER CFG40 GUIDE: HERE! IF YOU HAVE USB LOADER QUESTIONS PLEASE ASK IN THIS PROVIDED LINK!
USBLOADER GX GUIDE: HERE! IF YOU HAVE USB LOADER GX QUESTIONS PLEASE ASK IN THIS PROVIDED LINK!
PLEASE DO NOT ASK USB LOADER QUESTIONS IN THIS THREAD!
==============================================================
PLEASE DO NOT ASK QUESTION ABOUT SPECIFIC GAME ISSUES IN THIS THREAD. IF YOU HAVE AN ISSUE THEN USE 1 OF THE BELOW COMPATIBILITY LIST THAT CORRESPONDS WITH THE METHOD YOUR USING.
BACKUP DISC LOADER COMPATIBILITY LIST
SD/USB LOADER COMPATIBILITY LIST
GAME CUBE COMPATIBILITY LIST
IF THERE IS NO SOLUTION OR THE GAME IS NOT LISTED THEN ASK IN THE FORUM BY STARTING A NEW THREAD (DO NOT ASK IN THIS THREAD).
PLEASE DO NOT ASK ME TO DO A USB LOADER GUIDE! YOU CAN USE 1 OF THE FOLLOWING GUIDES ABOVE!
PLEASE DO NOT ASK ME TO POST MY OLD GUIDE FOR BACKUP LOADING FROM DISC CHANNEL! I WILL NOT POST IT AND WILL IGNORE ANY REQUEST ASKING FOR ME TO POST IT!
Credit goes out to After Dawn Forum Addict larrylje where I took this guide and all those that take the time to make applications to make Wii modding possible. Keep up the good work.!
Bootmii as IOS will boot from Homebrew Channel Home screen. Navigate using Game Cube Controller (if you do not have a Game Cube Controller then you will not be able to navigate the Bootmii menu to backup your NAND). If this is the case then skip backing up your NAND.
FOR MORE INFO ON HOMEBREW CHANNEL GO HERE.
FOR MORE INFO ON BOOTMII GO HERE.
Those that have previoulsy installed Bootmii or HBC and want to update to the latest versions only need to install over the older versions.
This is a warning for those that decide to install/update to the latest DVDx version. Due to the Title ID of DVDx being changed previous applications that use DVDx will need to be recompiled to look for the new Title ID of DVDx. Please do not ask questions about DVDx or apps that use it in this thread. This is just a courtesy warning to those that use it. If you have an issue with DVDx or an application that uses DVDx please start a new thread.
Those that have an Upside down Homebrew Channel can uninstall the HBC then reinstall it. If that doesn't fix it then run DOP-IOS and install IOS61 without sig/hash patch.
==============================================================
IT IS SAFE TO DOWNGRADE IOS15 ON ALL SYSTEMS! THOSE THAT HAVE A LU64, LEH250 OR LAH113 AND ABOVE SHOULD NOT DOWNGRADE ANY OTHER IOS OTHER THEN IOS15!
DOWNGRADE IOS15:
Start Trucha Bug Restorer (Launch with Homebrew Channel).
Press B to continue without IOS reload (ios at the top can be left as default)
After a few seconds you will get a message that says Press 1 to start the application. At that time press 1
Go to Downgrade IOS15 and press A.
When you see...
When you see...
After prepration...
Press A for Step 1
Press A for Step 2
Press Any button to exit the application.
MORE INFO ON TRUCHA BUG RESTORER HERE.
==============================================================
PATCH IOS36:
Start Trucha Bug Restorer again.
Select which IOS to Load (Change to IOS15) and Press A.
Again after a few seconds you will get a message that says Press 1 to start the application. At that time press 1
Go to IOS36 menu and Press A.
Make sure you select the below settings...
Install IOS to Slot: 36
patch hash check (trucha): YES
patch ES_Identify: YES
patch nand permissions: YES
then go up to Install patched IOS36 and press A.
When you see...
After preparation press A to install.
After the install is finished Press any button to exit.
==============================================================
RESTORE IOS15:
Start Trucha Bug Restorer again.
Select which IOS to Load (Change to IOS36) and Press A.
Again after a few seconds you will get a message that says Press 1 to start the application. At that time press 1
Go to Restore IOS15 and Press A
When you see...
After preparation press A to install.
After the install is finished Press any button to exit.
==============================================================
cIOS38_rev14:
Start the Homebrew Channel and run "cIOS38_rev14 Installer".
Select IOS36 for the IOS to use for Instillation.
Select WAD Installation.
After the cIOS is installed the Wii should reboot to the Wii Channel menu.
WARNING: If you get a ret- error please redownload the WAD files using NUS and redo steps Downgrade IOS15/Patch IOS36/Restore IOS15 (Also make sure your using a SD Card NOT Micro-SD with Adapter).
==============================================================
NeoGamma R7:
Run WAD Manager.
Select A to agree to the disclaimer.
Select IOS version to use:
Select NAND Emulation device
Select source device:
Go to NeoGamma_R7.wad and press A.
Select action:
FOR BEST BACKUP COMPATIBILITY USE QUALITY DVD-R MEDIA (NOT DVD+R OR RW). I ALSO DON'T WANT THOSE THAT USE DVD+R MEDIA TO POST IN THE THREAD AND SAY THAT YOU USE DVD+R MEDIA. I COULD CARE LESS WHAT MEDIA YOU USE! FOR BEST BACKUP COMPATIBILITY RESULTS USE DVD-R MEDIA!
==============================================================
IOS60Patched:
IOS60Patched only needs to be installed if you have 4.0 or 4.1 firmware.
Run WAD Manager.
Select A to agree to the disclaimer.
Select IOS version to use:
Select NAND Emulation device
Select source device:
Go to IOS60Patched.wad and press A.
Select action:
After the WAD files are installed press HOME to return to the Wii System menu.
Now you can load Wii backup games from NeoGamma R7.
==============================================================
EXTRA STEPS: YOU DO NOT HAVE TO FOLLOW THESE STEPS BUT I HAVE ADDED THEM IN CASE YOU WANT TO.
4.0 SYSTEM MENU:
Those that have 3.4 and below firmware can follow this section to update to System Menu 4.0 (if you have 3.4 firmware or below and want to update to 4.1 firmware perform this step first before updating to 4.1 System Menu).
[ REQUISITES ]
150-250 free blocks.
Internet connection.
Start Homebrew Channel and run Firmware Updater 4.0 and follow the on-screen instructions.
4.1 SYSTEM MENU:
Those that have 4.0 firmware can follow this section to update to System Menu 4.1 (if you have 3.4 or below firmware then run the 4.0 Updater first before running this 4.1 Updater).
[ REQUISITES ]
150-250 free blocks.
Internet connection.
Start Homebrew Channel and run Firmware Updater 4.1 and follow the on-screen instructions.
4.2 Shop Channel v18:
Those that want to update to 4.2 v18 Shop Channel can follow the below instructions.
Start the Homebrew Channel and run 4.2 Shop Channel and follow the on-screen instructions.
At spots it can seem like it has frozen. Do not restart or turn off Wii just let it do its work.
Game Cube Support:
WARNING: I DON'T KNOW IF cMIOS IS COMPATIBLE WITH LU64, LEH250 OR LAH113 AND ABOVE SYSTEMS. IF ANYONE KNOWS FOR SURE LET ME KNOW AND I WILL REMOVE THIS WARNING.
1) Launch the Homebrew Channel via the Wii channel menu. Select the cMIOS Installer in the Homebrew Channel list. This will start the installer. You need to press A to accept that you have read the disclaimer.
You have 2 options on how to install the cMIOS files (you do not need to do both options!)...
WAD Installation: Google RVL-mios-v8.wad and download it. Then place it in the root of the SD Card. Then chose WAD Instillation option.
Network Installation: At the instillation option screen press right 1 time on the D-pad of the Wiimote. This will download the files via WiFi.
After you have selected the option you want and installed the cMIOS your Wii should reboot to the Wii Channel menu.
Now you can launch the backup Game Cube games from the NeoGamma R6 backup launcher channel in the Wii channel menu.
DOP-IOS:
I would suggest using DOP-IOS to install and patch newest version of the below IOS.
ALL SYSTEMS/SERIAL # CAN USE DOP-IOS. THOSE WITH LU64, LEH250 OR LAH113 AND ABOVE CAN USE THIS APPLICATION. DO NOT DOWNGRADE ANY IOS OR FIRMWARE. INSTALL & PATCH THE LATEST IOS REVISION AVAILABLE INSTEAD OF DOWNGRADING TO A LOWER REVISION. DOWNGRADING TO A LOWER REVISION MAY BRICK YOUR SYSTEM!
IOS9 - Used by launch titles (Zelda).
IOS12 - (no description).
IOS13 - (no description).
IOS15 - (no description).
IOS17 - (no description).
IOS21 - Used by old 3rd party titles.
IOS31 - (no description).
IOS33 - (no description).
IOS34 - (no description).
IOS35 - Used by Super Mario Galaxy.
IOS37 - Used mostly by music games.
IOS38 - Used by some modern titles.
IOS53 - Used by some modern titles and channels.
IOS55 - Used by some modern titles and channels.
IOS56 - Used by Wii Speak.
Start DOP-IOS (via Homebrew Channel).
Go to IOS9 (use D-Pad left & right).
Press A to install latest version.
Press A at Are you sure you want to install IOS9 vXXXX.
Press A at Apply Sig Hash Check patch to IOS9.
Let it do its work (Be patient it may seem that the Wii system has froze but do not turn off or reset the system).
After it has finished press any button to continue.
You should now go back to the DOP-IOS main screen. Now use the d-pad (left & right) to go to the next IOS I have listed above. Follow the above directions to install and patch the newest version of that IOS.
After you have done the last IOS in the above list (IOS56) and you go to the Main Screen press HOME button to exit DOP-IOS.
FOR MORE INFO ON DOP-IOS GO HERE.
Hermes' IOS 222/223:
Those that want to play Guitar Hero or Rock Band will need to perform this guide HERE so the instruments can be synced to the system. I do not use this myself so if you have any questions or issues start a new thread and ask. I just wanted to give a link for those that want to install it.
==============================================================
YOU CAN NOW FORMAT THE SD CARD TO CLEAR ALL SOFTMOD PACK APPLICATIONS AND FILES FROM IT.
==============================================================
USB LOADER SECTION:
SDUSB LOADER CFG40 GUIDE: HERE! IF YOU HAVE USB LOADER QUESTIONS PLEASE ASK IN THIS PROVIDED LINK!
USBLOADER GX GUIDE: HERE! IF YOU HAVE USB LOADER GX QUESTIONS PLEASE ASK IN THIS PROVIDED LINK!
PLEASE DO NOT ASK USB LOADER QUESTIONS IN THIS THREAD!
==============================================================
PLEASE DO NOT ASK QUESTION ABOUT SPECIFIC GAME ISSUES IN THIS THREAD. IF YOU HAVE AN ISSUE THEN USE 1 OF THE BELOW COMPATIBILITY LIST THAT CORRESPONDS WITH THE METHOD YOUR USING.
BACKUP DISC LOADER COMPATIBILITY LIST
SD/USB LOADER COMPATIBILITY LIST
GAME CUBE COMPATIBILITY LIST
IF THERE IS NO SOLUTION OR THE GAME IS NOT LISTED THEN ASK IN THE FORUM BY STARTING A NEW THREAD (DO NOT ASK IN THIS THREAD).
PLEASE DO NOT ASK ME TO DO A USB LOADER GUIDE! YOU CAN USE 1 OF THE FOLLOWING GUIDES ABOVE!
PLEASE DO NOT ASK ME TO POST MY OLD GUIDE FOR BACKUP LOADING FROM DISC CHANNEL! I WILL NOT POST IT AND WILL IGNORE ANY REQUEST ASKING FOR ME TO POST IT!
Credit goes out to After Dawn Forum Addict larrylje where I took this guide and all those that take the time to make applications to make Wii modding possible. Keep up the good work.!