Monday, November 2, 2009

Soft modding your cursed PSP 3000 models and PSP 2000 TA-088v3 mobo (UPDATED 11.14.2009)

Due to the release of Team GEN's Custom Firmware 5.03-B for ChickHEN r2, here's another tutorial for bringin up those Damned PSPs (PSP-3000 models and PSP-2000 with TA-088v3 cursed mobos) for customization.

Bring that PSP from your cabinet, take that rug and wipe that dust out because you'll be happier with this tutorial.

Things needed:
  • Playstation Portable (2000 model with TA-088v3 and 3000 series) and must be on Version 5.03 (OFW)
  • ChickHEN R2 (download it here)
  • Team GENs GEN's Custom Firmware 5.03-B for HEN (download it here)
  • Team GENs GEN's Custom Firmware 5.03-A (optional)
  • Sedna (download it here)
  • Original MS Pro Duo Memory Stick (recomended)

Note: Also be informed that you are liable for taking the risk on modifying your handheld console and your PSP cannot use pandora. You've been warned.

And if you know what you're doing, let's set that up.

You should see this first on Settings, System Settings, System Information:

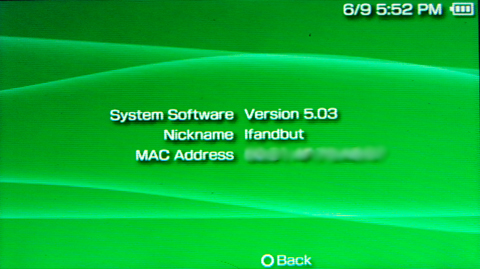
If your PSP matches then you are ready.

Note: If your PSP is on CFW 5.03 GEN-A HEN then you may skip this procedure and may procede to CFW 5.03 GEN-B for HEN installation.

Download ChickHEN R2 here and CFW 5.03 GEN-A here

Copy it on your PSP.


In the base ChickHEN folder there are 2 directories. For the PSP-3000 we will want to use the SLIM directory. In it you will find a folder called ChickHEN. Connect your PSP to the computer (in this tutorial we will be using drive G).
Copy the ChickHEN folder to G:\PSP\PHOTO. If the PHOTO directory does not exist then create it.


In the ChickHENR2 folder (the one extracted from the zip file) there is a file called h.bin. Copy this to your PSP's root directory (G:\).

You now can have HEN (Homebrew Enabler) on your PSP.

To get the custom firmware loaded keep reading.

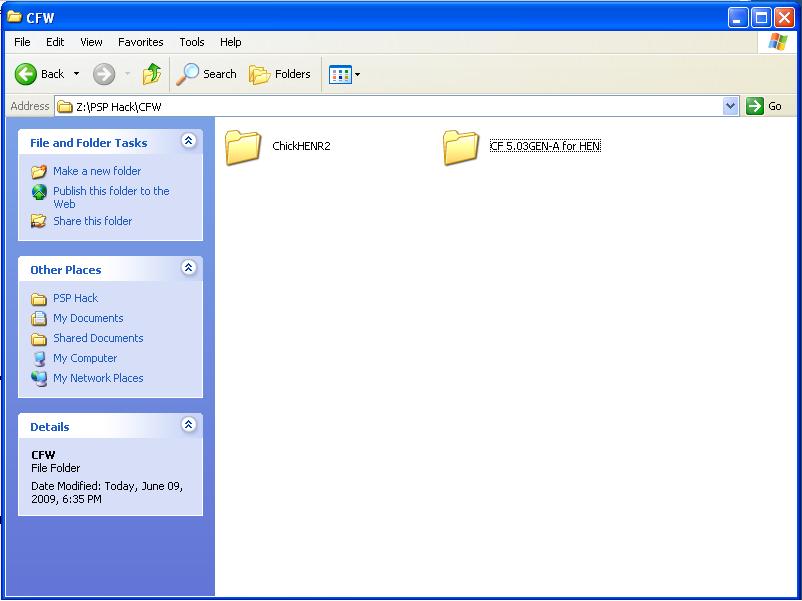
In the "CFW 5.03GEN-A for HEN" folder there will be a program named LAUNCH-ME.exe. Open it. Make sure it is set up like I have it except change the "PSP Unit Drive:" box from G to what ever your PSP's letter is.

Click Start and a you will get a box that just says Done. Click OK.

Now look at your PSP and you should see a new folder called files.You are good to go.

Disconnect your PSP from the computer. On the XMB go to Photo; Memory Stick and open the ChickHEN folder.


Once opened your PSP will be showing this images as it like malfunctioned but it's normal and it will reboot


Check your firmware version and you should see that you are now running ChickHEN R2.


Go to Game; Memory Stick and run the INSTALLER-LOADER (or PSP CFW 5.03 GEN-A)program.


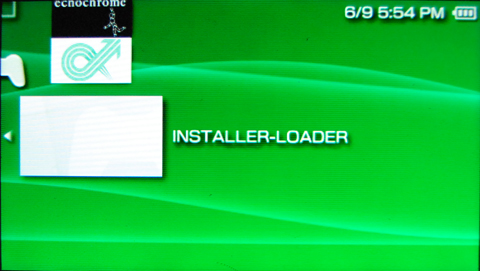
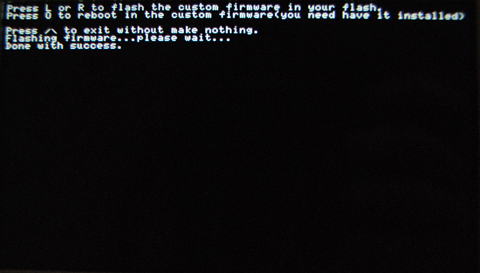
Press R or L and wait a few seconds while the CFW gets installed. Then press O to reboot the PSP.


Once the reboot is complete then check your firmware one final time.

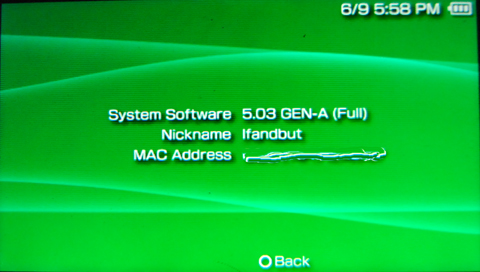
If it looks like this then you are now ready to update on CFW 5.03 GEN-B.


(Note: If you already have plugins on your Memory Stick, remember to disable it.)
Here's is the screen shot of Recovery Menu on M33 CFW:
M33 Recovery Menu Pictures, Images and Photos

From the Main Menu of Recovery, go to Plugins and disable everything from there.

After that, download the archive of the Custom Firmware 5.03GEN for HEN-B (PSP-3000)
Connect your PSP to the computer via USB
Go to Settings, USB Connection option (if your PSPs USB Auto Connect feature is not enabled)
Click the Right-click the file you downloaded,
Choose extract files ... (WinRAR is recommended)
Extract it on Desktop
Press OK and wait extraction files
Exit the USB mode

Go to Game, Memory Stick and start 5.03 GEN B-Quick Update
5.03GEN-B -2

Press X.
Once the application starts, you have several choices:
Cross: Run the patch right small
The relevant files are flashing on your console. THERE IS NO RISK OF BRICK IN THIS PROCCESS.
Then, once installed, press X to reboot in CFW 5.03GEN-B.

Once installed it will give you a result like this.

5.03GEn-B - 1

Installing Sedna plugin.

Sedna is compatible 5.03 GEN-A/B


This plugin allow to :
-Patch the Reboot of the PSP
-Patch the Shutdown of the PSP
-Hide UMD Update Icon
-Patch flash 0, 1, 2, 3 USB accèss
-Redirecting the file version.txt to ms0:/PSP/SYSTEM/version.txt
-Patch the blit TIFF image "blit corrupted data for file with extension .tiff"

How to install it
For install it copy the folder seplugins in the root of your Memory Stick
and copy this line ms0:/seplugins/Sedna.prx 1 in the file X:\seplugins\vsh.txt, X:\seplugins\game.txt

X = Letter of your PSP in Computer

How to use it
Is it independent, you nothing to do has been have activated, it work in background.

Known Bugs
Some Reboot/Shutdown is still executed despite the patches apply. 
 
Download: Sedna here


Now your PSP is capable of doing the following:
  • Play games that introduce their own cfw detection / protection
  • Play PSOne games
  • Play games (UMD or backup) requiring firmware 5.50+, including 6.xx
  • Access to the VSH and Recovery Console

Credit goes out to the guys who made this applications possible:
  • Yoshihiro, GENyUS, Magixien and the rest of Team GEN
  • Davee, Matiaz and the rest of Team Typhoon
  • DCEmu resident Infandbut (for the screenshots)


Bookmark and Share
Continue Entry»

Sunday, November 1, 2009

Installing Free MC Boot via Swap Magic and FCEUltra for Playstation 2

ps2
I'm Sure the reason why you're seeing this is that you failed on your first atempt to Install Free MC Boot (FMCB) on your Playstation 2 memory card. Worry no more because if this method still not work then your USB stick is the problem. Now on with the guide!

Things needed:
  • Action Replay EVO
  • Memory card for Playstation 2 (8Mb will work)
  • USB Stick (4Gb and below)
  • Free MC Boot release Package
  • FCEUltra.elf (optional method)
  • SwapMagic 3.8 coder ELF (optional method)
  • Playstation 2 Console (off course!)

Free MC Boot is a program that allows a user to boot homebrews without modchip or swap once installed on the Memory Card. It runs on official 8MB Sony MC's as well as 3rd party cards. (with the exception of those needing a boot disc to be recognized or cloned Chinese cards)

Prepare the files:

Note: FMCB installer will not boot directly from Action Replay Max. This is why you must have an AR Max EVO with the Max Media Player.

Copy the FREE_MCBOOT.ELF and the INSTALL folder to the USB root.

On the USB stick create a folder, named SWAPMAGIC
Rename a copy of uLaunchELF's BOOT.ELF to SWAPMAGIC.ELF and put it in the folder.

DO NOT put the FREE_MCBOOT.ELF or the INSTALL folder in this folder!!!


Next put the SW3.8C.ELF {or whatever its named} on the USB stick root [[not in the folder]]
In this tutorial, i named the SM3.8C.ELF to SWAPMAGIC.ELF for simplicity.


Follow the steps for the Media Player and select the SWAPMAGIC.ELF

Insert the USB stick and the AR Max disc, then run the disc. Note: The USB device MUST be inserted before running the disc!

SWAP MAGIC METHOD:

In the main screen of AR Max, select the Media Player


After a few splash screens,


the Media Player intro will start, you can just press X to skip it. AR Max will now read the USB stick and display file(s).

In the Media Player menu:


SwapMagic should automatically run uLaunchELF


Next press O to goto the FileBrowser screen

Goto mass:/ and  select the FREE_MCBOOT.ELF......... after a quick flash of the launch splash, Free McBoot's Installer will load.

If that didnt automatically boot to uLaunchelf, then continue thru the menu's.


On the main screen, select SMBOOT


next screen, select SMBOOT0


If it  still didnt boot or you black screened, try  renaming uLaunchELF's BOOT.ELF to SMBOOT0.ELF  and try again.

Or go to the next alternative method below:


FCEULTRA

Copy the  FCEUltra.elf to the USB stick and follow the steps above to run the Media Player.

Select the  FCEUltra.elf from the  Media Player and PLAY it.


Main Menu of FCEUltra:


Press SELECT button for the configuration menu:


Select  " Configure ELF Path " and press the O button


Select mass:  and  then  FREE_MCBOOT.ELF from the list on your USB stick.


You will be returned to the  Options screen and see the  changed path .  Now just select  Exit to ELF


The installer should now boot!!

__________________________________________________________________________

A successful boot of the Free McBoot Installer will look like this:


Be sure to read the User Guides for any updates and new features.

If none will display, then try another USB device.

FMCB is free for all and if you paid for it you've been scummed!

And if you're not, then why not compensate the efforts on FMCB developers, it will be shared beetween the 2 FMCB authors. Go Donate!

Credits goes out to the authors of this awsome release; Neme & jimmikaelkael.
Bookmark and Share
Continue Entry»

Playstation 2 Soft Mod thru Free MC Boot

ps2
It was last month when I opened my Playstation 2 Slimline and been bored with some games I purchased. I like to optimize my usage on my favorite gaming machine so I've looked up on the internet and I was directed to this site where only the things needed are:

  • Action Replay EVO
  • Memory card for Playstation 2 (8Mb will work)
  • USB Stick (4Gb and below)
  • Free MC Boot release Package
  • FCEUltra.elf (optional method)
  • SwapMagic 3.8 coder ELF (optional method)
  • Playstation 2 Console (off course!)

Free MC Boot is a program that allows a user to boot homebrews without modchip or swap once installed on the Memory Card. It runs on official 8MB Sony MC's as well as 3rd party cards. (with the exception of those needing a boot disc to be recognized or cloned Chinese cards)

Note: if this method does not work you may go here.

Prepare the files:

Note: FMCB installer will not boot directly from Action Replay Max. This is why you must have an AR Max EVO with the Max Media Player.

Copy the FREE_MCBOOT.ELF and the INSTALL folder to the USB root.

Insert the USB stick and the AR Max disc, then run the disc. Note: The USB device MUST be inserted before running the disc!

In the main screen of AR Max, select the Media Player


After a few splash screens,


the Media Player intro will start, you can just press X to skip it. AR Max will now read the USB stick and display file(s).

In the Media Player menu:
Choose the FREE_MCBOOT.ELF by scrolling with the 'Next Item' button on screen if it is not the first file shown, as the Media Player only displays 1 item at a time.


Select Play button and the installer will boot.


A successful boot of the Free McBoot Installer will look like this:


Be sure to read the User Guides for any updates and new features.
In the event of a blackscreen, try one of the following alternative methods.

Note: Many USB devices are simply not fully compatible with AR Max, even though they recognise the device, it may not show all files or boot them properly. Don not take out the USB device and re-insert it while
AR Max is running, "Hot-Swapping" is not a good idea with AR Max.

Here are 2 known methods you can try to get around the incompatibility if either one will show in the Media Players menu.

If none will display, then try another USB device.

FMCB is free for all and if you paid for it you've been scummed!

And if you're not, then why not compensate the efforts on FMCB developers, it will be shared beetween the 2 FMCB authors. Go Donate!

Credits goes out to the authors of this awsome release; Neme & jimmikaelkael.
Bookmark and Share
Continue Entry»

Halloween Tricks

Halloween Jack O pumkin lantern
I know this is not about homebrew and very off topic but just want to share and ask you guys on what's the game that always chills you when you're alone while playing?

Well, if I'm not posting on blogger, surfing news or making modifications on my game consoles, m mine are Silent Hill Origins on PSP, Resident Evil on Playstation, Manhunt 2 again on PSP and off course... Fatal Frame Series (played at Playstation 2).

How bout you guys?

Bookmark and Share
Continue Entry»